Common Windows Operations
There are a number of simple operations that are common to all applications that run in Windows, so it pays to know them!
To use Windows efficiently, you must master a few simple operations, such as pointing and clicking, dragging and dropping, and right-clicking. You perform all these operations with your mouse.
Firstly: Training your Mouse
Since the mouse is a primary means of interacting with your computer, it
needs to be as easy to use as possible. If you change your mouse or move from
the Trackpad to a mouse, you will benefit greatly from adjusting the speed of
movement of the pointer. Don't put up with a speed that you can "just manage" -
adjust it to the best speed for you by following these steps.➤
it
needs to be as easy to use as possible. If you change your mouse or move from
the Trackpad to a mouse, you will benefit greatly from adjusting the speed of
movement of the pointer. Don't put up with a speed that you can "just manage" -
adjust it to the best speed for you by following these steps.➤
Pointing and Clicking
The most common mouse operation is pointing and clicking. Simply move the mouse so that the cursor is pointing to the object you want to select, and then click the left mouse button once. Pointing and clicking is an effective way to select menu items, directories, and files.
Double-Clicking
If you're using Windows' default operating mode, you'll need to double-click an item to activate an operation. This involves pointing at something on-screen with the cursor and then clicking the left mouse button twice in rapid succession. For example, to open program groups or launch individual programs, simply double-click a specific icon: single-clicking will simply Select, double will perform an action.
Right-Clicking
When you select an item and then click the right mouse button, you'll often see a pop-up menu. This menu, when available, contains commands that directly relate to the selected object (hence its name of "Context Menu"). Refer to your individual programs to see whether and how they use the right mouse button, or just experiment - nothing bad can happen!
Dragging and Dropping
Dragging is a variation of clicking. To drag an object, point at it with the cursor and then press and hold down the left mouse button. Move the mouse without releasing the mouse button, and drag the object to the new location. When you've finished moving the object, release the mouse button to drop it onto the new location.
You can use dragging and dropping to move files from one folder to another or to delete files by dragging them onto the Recycle Bin icon.
Hovering
When you position the cursor over an item without clicking your mouse, you are hovering over that item. Many operations require you to hover your cursor and then perform some other action.
Moving and Resizing Windows
Every software program you launch is displayed in a separate on-screen window, which may be fully-visible, partly-visible or not visible, depending on what other windows are open and the sizes of these windows. When you need to open more than one program, you get more than one window—and your desktop can quickly get cluttered.
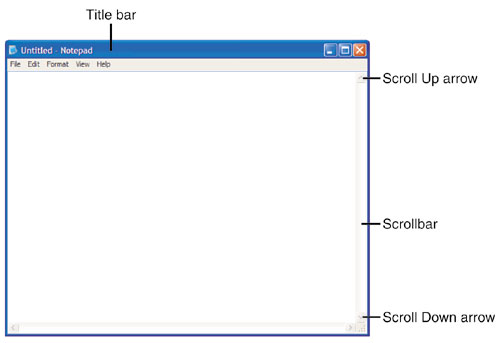
There are many ways to deal with desktop clutter. One way to do this is to move a window to a new position. You do this by positioning your cursor over the window's Title Bar (shown in Figure 3.2) and then pressing and holding down the left button on your mouse. As long as this button is depressed, you can use your mouse to drag the window around the screen. When you release the mouse button, the window stays where you put it.
You also can change the size of most windows. You do this by positioning the cursor over the very edge of the window—any edge. If you position the cursor on either side of the window it will turn into a double-headed arrow and you can resize the width. If you position the cursor on the top or bottom edge, you can resize the height. Finally, if you position the cursor on a corner, you can resize the width and height at the same time.
After the cursor is positioned over the window's edge, press and hold the left mouse button; then drag the window border to its new size. Release the mouse button to lock in the newly sized window.
Maximizing, Minimizing, and Closing Windows
Another way to manage a window in Windows is to make it display full-screen. You do this by maximizing the window. All you have to do is click the Maximize button at the upper-right corner of the window, as shown in Figure 3.3.
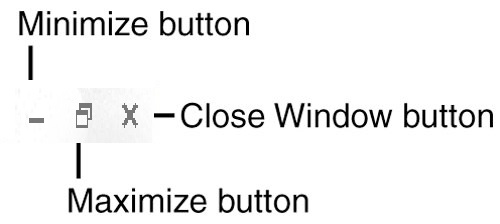
buttons to manage your desktop windows.
If the window is already maximized, the Maximize button changes to a Restore Down button. When you click the Restore Down button, the window resumes its previous (pre-maximized) dimensions.
If you'd rather hide the window so that it doesn't clutter your desktop, click the Minimize button. This clears the window off the desktop onto the Taskbar. The program in the window is still running, however—it's just not on the desktop. To restore a minimized window, all you have to do is click the window's button on the Windows Taskbar (at the bottom of the screen).
If what you really want to do is close the window (and close any program running within the window), just click the window's Close button.
CAUTION
If you try to close a window that contains a document that you haven't saved in its current state, you'll be prompted to save the changes to the document. Because you probably don't want to lose any of your work, click Yes to save the document and allow the program to close.
to scroll through long pages.
Scrolling Through a Window
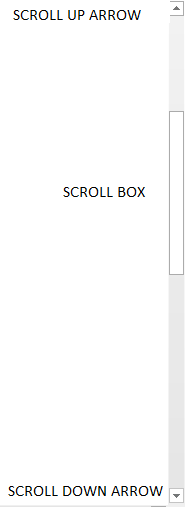
Many windows contain more information than can be displayed at once. When you have a long document or Web page, only the first part of the document or page is displayed in the window. To view the rest of the document or page, you have to scroll down through the window, using the various parts of the scroll bar (shown in Figure 3.4).
There are several ways to scroll through a window. To scroll up or down a line at a time, click the up or down arrow on the window's scrollbar. To move to a specific place in a long document, use your mouse to grab the scroll box (the 'slider' between the up and down arrows) and drag it to a new position. You can also click on the scroll bar between the scroll box and the end arrow, which scrolls you one screen at a time - a quick way to move around.
If your mouse has a scroll wheel, you can use it to scroll through a long document. Just roll the wheel back or forward to scroll down or up through a window.
Using Menus
There are still a few old-style menu operations common to Office programs.
The File menu gives access to the kind of commands that do not relate to your document content editing.

Using Ribbons
Most Windows programs (all Microsoft Office programs) put the most frequently used operations on one or more Ribbons, located just below the menu bar, which now acts simply as a ribbon selector - there are no dropdown menus as formerly. (Figure 3.6 shows a typical Windows ribbon.) A ribbon has a graphical representation of the various function available.
Some ribbon items have a tiny black arrow to the bottom right. This indicates that additional choices are available, displayed on a submenu or dialog box. Click the arrow to display the dialog.
TIP
If an item in a menu, toolbar, or dialog box is dimmed (or greyed), that means it isn't available for the current task.
Using Dialog Boxes, Tabs, and Buttons
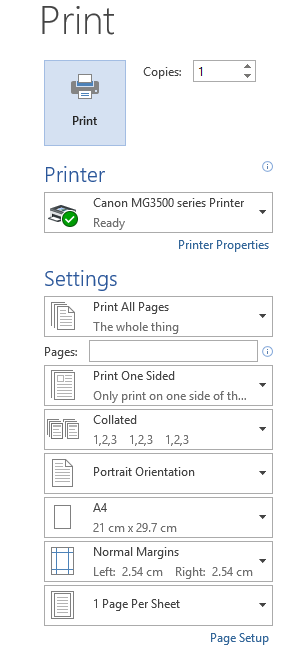
When Windows or an application requires a complex set of inputs, you are often presented with a dialog box. A dialog box is similar to a form in which you can input various parameters and make various choices—and then register those inputs and choices when you click the OK button. (Figure 3.7, below, shows the Print dialog box, found in most Windows applications.)
There are several different types of dialog boxes, each one customized to the task at hand. However, most dialog boxes share a set of common features, which include the following:
Buttons — Most buttons either register your inputs or open an auxiliary dialog box. The most common buttons are OK (to register your inputs and close the dialog box), Cancel (to close the dialog box without registering your inputs), and Apply (to register your inputs without closing the dialog box). Click a button once to activate it.
Tabs — These allow a single dialog box to display multiple "pages" of information, separated by 'Tabs', like file dividers. Click a tab to move to that particular page of information.
Text boxes — These are empty boxes where you type in a response. Position your cursor over the empty input box, click your left mouse button, and begin typing.
Lists — These are lists of available choices; lists can either scroll or drop down from what looks like an input box. Select an item from the list with your mouse; you can select multiple items in some lists by holding down the Ctrl key while clicking with your mouse.
Check boxes — These are boxes that let you select (or deselect) various standalone options.
Sliders — These are sliding bars that let you select increments between two extremes, similar to a sliding volume control on an audio system.
Tip
If you're not sure which button does what, you can hover the cursor over the button to display a Tool Tip. A Tool Tip is a small text box that displays the button's label or other useful information. They are ubiquitous in Windows applications.
various aspects of your Windows applications.